Grade 2/3 Clay Pinch Pot/Bells
We needed some seasonable fun, and those grade 2/3 faces were just the ones to receive it!
(Plus, I was just so glad to get back to some kind of clay work)
Class 1.
There was already an excitement in the classroom even before we got started when they saw it was a clay day. Woo hoo!! We stapled canvas strips from my studio to the oak tables for work surfaces, and each student willingly donned a smock to begin.
Only a couple had ever made a pinch pot before, so I demonstrated from the front, making a small smooth ball and then digging in with my thumb to begin slowly pinching round and round from the bottom up. Not too much water – just moistened hands would do it.
Cutting a triangle out of the rim and reconnecting those edges would keep the finished bell from flaring out too much. The clay was soft enough that one didn’t really need to score and slip to join it, but I showed them that anyway as an option. the next step was to drill a small hole in the bottom of the pinch pot using a pencil – this was for the string to pass through for the action of the bell.
Three more clay parts remained to be made:
1) roll a “snake” on the canvas table about as long as your hand. That’s going to be your handle.
2) roll a small ball about the size of a marble. Take the pin tool and put a small hole in it: ALL the way through. You should be able to see the light through the hole. When you swivel the pin tool in the ball it will make the hole bigger, and that will help when the clay shrinks in the firing. This is the “clapper” – they were quick to figure what that term meant.
3) there should be some little bits of clay left over. Roll them, flatten them out to make embellishments on the bell it self. Maybe even a real skinny long snake to make a fancy rim! These will require some scoring/scratching on both the part and the bell to help attach.
Now it was time to put them together!
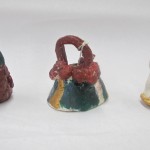
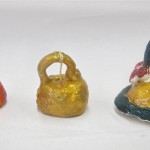
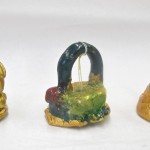
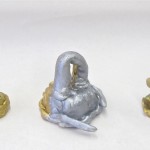
I encouraged them to use the scoring technique when joining the handle to the pinch pot bell, and any of the applique decorations. They would need to press firmly when attaching, and smooth out any cracks. I supplied them with small damp sponges to help with that. (Not water – too much will create more problems with weakening and cracking) We set the bells with their clappers inside for drying and firing.
Class 2.
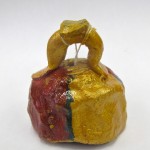
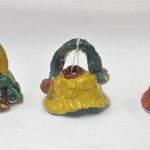
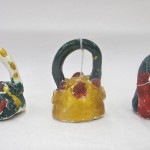
The bells were now bisque fired, and there was no time for glaze, so I gave them acrylics and modge podge to finish. They happily chose their colours (and one can see that the gold was particularly popular) and got to painting. The teacher and I threaded the clappers and tied them through to the handle. Modge podge was applied to preserve the paint, give some gloss, and fix the string.
You know? They sounded pretty good, and the kids were so proud of their gifts to take home.
You must be logged in to post a comment.